Sometimes a project will take me so long to complete that I:
a) learn to live with a half-done mess
b) give up and start on something else
c) down an entire bag of chocolate covered cinnamon bears - but you don't need to know that.

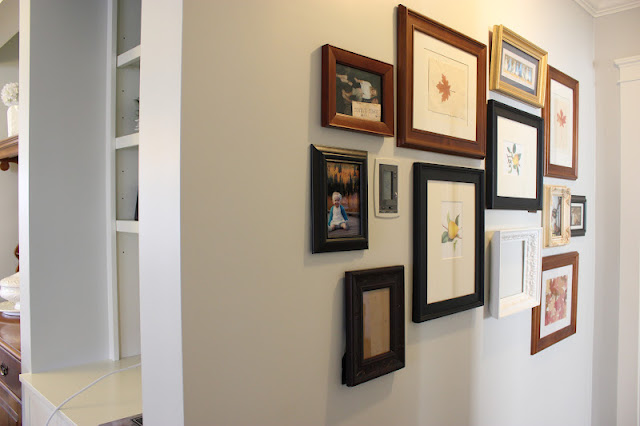
I have been working on the gallery wall for a while now (you can see the beginning stages in this post). Yes, I started January 13th. I know, it's pathetic. My only excuse is that an entire bag of chocolate covered cinnamon bears tends to make me feel a little sluggish. Did I mention that there might have been more than one bag? But you don't need to know that.
Here's what you do need to know:
I rounded up all the un-used, ugly, and mis-matched frames we had laying around. I started by tracing around each frame on some brown paper bags. I cut them out and taped them up, moving them around and around until we reached a placement that we liked. I measured and marked how each individual frame would hang and hammered a nail right through the brown paper.
I knew that I would need to paint the frames, but I wasn't sure what color I wanted or even if I would paint them all, so I hung them as they were - empty, side-ways, and/or upside down. They stayed that way for way too long while I ate another bag of chocolate covered cinnamon bears consulted my advisor and contemplated my next move.
I definitely wasn't liking so many different colors on the frames - it made the whole arrangement look too messy, but I also didn't want them all white or all black - I was worried that would look too sterile. I settled on a compromise by painting everything (except the black frames and the one gold) white.
This next picture is to prove that we live in the real world, where people are clutzy and run into the wall where the frames are hung (I won't name names..er...Mr...), and where the brand-spanking-new baseboards that were just installed get munched by falling frames. **Note to self: find a clutz-proof method to keep the frames on the wall and off the baseboards. Nails alone are not cutting it.


6 comments:
Yikes! Have you ever heard of FUN TAK? It's a blue rubbery gummy stuff that would work well. Or there's the Museum Wax, I bought some recently, haven't used it. It did cost quite a bit more than the other stuff, though. Sometimes I find it in the school supply area. Hope you think of something.♥♫
My husband did the same thing! I thought I was being clever when I hung a keepsake frame (the hinged kind that opens) to hide a thermostat on the wall. Well my husband knocked it down when adjusting the temperature and damaged the wall and baseboard. I still haven't figured out how to fix it! Your gallery wall looks great though!
Your gallery wall looks so good, so worth all the effort you put into it I reckon.
Hey Cate - thought I commented last night - pic wall looks great.
Btw, I just nominated you for a Liebster Blog Award. Check out my post today for details
Looks good!
If you ever decided to use custom canvas photos for your walls...contact me :) feel free to check out my site!!
http://geezees.com/
Command Adhesive strips will do the trick. No more nails needed. I like the "velcro" kind because you can make adjustments if you don't get things perfectly straight. They also have hooks and other goodies that work with the adhesive and come off easily when you are done with them.
Post a Comment