

December 23, 2011
December 21, 2011
Things Are Looking Up
Remember when I first shared this inspiration photo? (see our kitchen inspiration images here)

There is much to love about this kitchen from Southern Living, but the one detail that really sealed the deal for me was that spectacular ceiling. I have been obsessing over bead-board ceilings for a long time now, so when we started our kitchen renovation (too long ago) I just knew I had to have one. I'll give you all the deets on how we accomplished it in another post, but for now here is the reason all of my guests go home with a kink in their necks. It is the first thing people remark on when they walk into our home. We are so happy with how it turned out - we might even someday forget the pain it caused us to install (but more on that later!)


November 9, 2011
How To: Safely Remove Old Paint from Hardware
There is paint on our hinges. And not in an 'I ate too many Mike & Ike's so now my hand looks like a tweeker with no cash and I inadvertently left a smidgen of paint on the hinge in my shaky wake' kind of way. Nope. We are talking an all-out, blatant disregard for painting etiquette. Always remove hardware before you wield a paint brush. Everybody knows that. At the very least, a lazy painter will tape over it. Fine. Your secret is safe with me. But slapping avocado green oil paint on an unsuspecting hinge followed by peach paint and then teal paint and then white paint is just down-right deranged.


Just looking at this hinge makes me cringe. It's not impossible to remove paint from hardware, but it isn't easy my friends, and it usually involves toxic stripper, burning fingers, and singed nose hairs, resulting in an angry cursing hinge owner. But now we have an eight month old so toxic fumes are no bueno, and we kind of like our nose hairs. So, that option sucks.

We could buy new hinges. But then our door wouldn't hang right. Hinges aren't made like they used to be. New hinges are made thinner. Not only that, if you have a door that is already hung, it has been fitted for that exact hinge. Putting on a different hinge, even if it is an old replacement hinge, will alter the fit of the door and may result in a door that squeaks, swings poorly, or worse, won't shut. Which is sort of what doors are for. So that option sucks as well.
Now what? What if I told you that you can remove paint from old hardware with nothing more than water and a tiny dose of dish soap? I know, I didn't believe it either. I saw it on Pinterest and immediately thought "this will never work." Nothing is ever that easy. Not for me. (Don't listen to my brother when he tells you I'm the Golden Child.)
So I put it to the test... a DIY myth bust...and it totally worked! Latex paint, oil paint, mystery paint. It all came off.
Want to try it? You know you are scanning your house right now looking for old painted hardware just to give it a go. It's easy and oh-so-satisfying. You know you want to. (This is getting strange. Let's move on.)
Find an old crock pot (or borrow your mother-in-law's - I won't tell). I bought mine back for $6.00 from the local thrift store that I had just donated my old crock pot to. Oh, hindsight, you make me look like such a jerk.
Throw your hardware in - OR tap into your OCD and carefully place in a pattern that would allow you to remember which hinge was which while at the same time maintaining a mathematically proportionate grid that is aesthetically pleasing. (Note to self: get help with OCD)
Fill crock pot with water.
Add a squirt of dish soap.
Turn on high and let sit overnight.

Remove hinge from water with tongs/pliers/chopsticks (metal + hot water = hot metal) and immediately scrape off any paint while the hinge is still hot. Most of the paint on our hinges came off in sheets. Some layers of paint we had to scrape with a putty knife, but it didn't take much effort.


Sand with steel wool to remove the remainder of the paint residue.

We sprayed ours with oil-rubbed bronze spray paint to match the new door-knobs, but keeping the metal in it's raw state would also look cool in the right house.
Disclaimer: We have yet to try this technique on any metal other than these hinges which are brass. Some metals may spontaneously self-combust whilst spinning out of control toward the great black hole in an alternate universe. Ok, I made that last part up, but we can't be held accountable for your metal mishaps. Crock (pot) at your own risk. Oh and rubber gloves aren't a bad idea either.
remove paint with a crock pot, how to, tutorial, remove old paint from hardware
November 1, 2011
Recap
Of all the things that I'm not good at - small talk, sports of any kind, parallel parking, and (according to my sister-in-law) parenting - blogging tops the list. Somehow this last month took the bullet train and suddenly Mr. is proclaiming "Holy crap! It's November!" Time flies when you're sleep deprived.
Just in case you were beginning to believe that we slept through all of October (if only), here is a recap of what we were up to:
Irritating our fellow passengers on our semi-annual pilgrimage to the Atlantic coast. Yeah, that man put his ear buds in to drown out H's protests for more Biscoff cookies. I joke. She does not yet get to enjoy the deliciousness that are Biscoff cookies. I ate them all. Yes, I know I can buy them at Dan's and eat them any day of the week. It's just not the same.


Playing in the leaves.

Hanging out with H's favorite cousin.


Playing with more leaves.


Yep, more painting.

Now, let's see if I can manage to post more than once this month!
Just in case you were beginning to believe that we slept through all of October (if only), here is a recap of what we were up to:
Irritating our fellow passengers on our semi-annual pilgrimage to the Atlantic coast. Yeah, that man put his ear buds in to drown out H's protests for more Biscoff cookies. I joke. She does not yet get to enjoy the deliciousness that are Biscoff cookies. I ate them all. Yes, I know I can buy them at Dan's and eat them any day of the week. It's just not the same.

Gearing up at our favorite surf shop in Cocoa Beach. H was not as impressed as we had hoped, though she did look mighty cute in her Ron Jon tee. Start em young.

Floating in the greatest hotel pool. Ever. Hands down.

Hilton Bonnet Creek, Orlando, Florida.

Seeing if all the living room furniture would fit in the dining room. Yep, it does.

Enjoying the fall colors at Silver Lake up Big Cottonwood Canyon.

Redecorating the built-ins in the living room with tools.

Playing in the leaves.

Hanging out with H's favorite cousin.

Getting lost in a corn maze.

Hanging crown molding.

Playing with more leaves.

Painting

More painting while H gets busy picking out new furniture from the Pottery Barn catalog.

Yep, more painting.

Now, let's see if I can manage to post more than once this month!
September 30, 2011
A Swing, a Miss, & a Homerun
Like every other parent since the dawn of time, when we had our daughter seven months ago, we made several naive declarations - I will never hold my daughter's back side up to my nose to check for a dirty diaper, I will never ride in the backseat with my child - and almost immediately ate our words. Almost everything we said we would NEVER do has been done...on many an occasion. I say almost, because we are still holding on to a modicum of self-respect. 1. We will NEVER drive a mini van. 2. We will NOT fill our house with cheap plastic kid stuff.
Number 1 has been easy to hold strong on. There are lots and lots of cars out there, and most of them will transport a child, no problem. However, the no cheap plastic kid stuff has proven to be slightly more difficult. Plastic and kids seem to have become synonymous these days. So when it came time to find a high chair we had to get a little creative. I quickly became obsessed with the idea of a turquoise high chair and I began a lengthy search for a vintage wood high chair that I could paint. A trip to my favorite consignment shops, boutiques, and second hand stores still left me empty handed. I almost gave up, thinking that wood high chairs must no longer exist.
Then I happened upon this picture on pinterest via Drew B. Photography. Oh. My. Lands. It was exactly what I wanted. My quest for that elusive turquoise high chair continued.

Finally, in desperation I turned to the KSL classifieds ( a local, better, version of Craig's list) and found a sturdy, vintage wood high chair for 25 smackers. The couple we bought it from used it for their only son twenty five years ago, put it in storage and hadn't thought about it since, and it is in perfect condition! (Their son must not have been as adventurous an eater as our little H!)

Here it is before, in the kitchen (which is still in progress so ignore the crazy splotchy walls and the cereal on the floor - I can't be expected to clean when under construction). The finish on the chair was still in pristine condition so I sanded it to rough it up so the primer would have something to stick to.

After one coat of Rustoleum grey spray primer.

A hit and a miss. (I don't know why I am busting out the baseball analogies today. I am not really a sports fan. Just a word nerd.) This is after one coat of Valspar's Exotic Sea spray paint. The second the first drops of paint hit the high chair, I knew I had made a huge mistake. The color was all wrong. Too bright. Too blue. A cool color, but not at all what I wanted.

After two coats of Krylon's Blue Ocean Breeze. Yes. Yes. Yes. This is the one. The home-run (sorry, I had to follow through on the sports lingo)!
A humble little note from the Editor (yep, that's me) about spray paint (and no, I am not being paid for this or any other of my many opinions, which is sad really, as I have a lot of them):
While the color of Valspar's Exotic Sea wasn't right for this project, their spray paint, in my opinion, is far superior to Krylon. It went on like a dream and coated really well. The Krylon on the other hand is thin and runny and has a tendency to run if you are not really careful.
A word to those buying spray paint at Michael's Craft: They are now locking up their multitude of spray paint, you know, in case any crafty hoodlums try to spray the display case. I am guessing that their paint doesn't turn over very often, because the two cans of Krylon I bought there (and then promptly returned) were extremely old and defective. I figure that most people won't go to the trouble of having the case unlocked (lazy crafters) and instead head to Smith's Marketplace (like I did) where your access to the trouble causing spray paint is not regulated (they also have a really wide selection.)
I also learned that not every store sells the same colors of the same brand. So while the Home Depot on 21st may carry the color Satin Jade, the Home Depot on 72nd may not. So you may want to call and ask about a specific color first before you drive all over town in search of Blue Ocean Breeze (or the perfect color of your choosing).
Go forth and spray paint (legally of course).
September 2, 2011
I Got It Covered
When I was little, my mother tried to give me sewing lessons. I scoffed at her, oh yes, I did scoff at her. I was more interested in hiding in my little room in the attic, cutting out pictures from Architectural Digest to create my dream house from bits and pieces of the glossy magazine. Sewing was for boring people.
Fast forward twenty + years and look at me now! I sew. Or I try to sew. In fact, almost every time I start a project I end up calling my mom to ask three hundred questions. "How do you thread this thing?" "Why is my bottom thread going all wonky?" "Was I a mistake?" (Oh wait, that's for another post.) My mother is too nice to do it to my face, but I'm sure she's the one laughing now. Boring people indeed.
It only took me six months (or is it eight? who's counting?), but I finally finished my very first quilt. Alright, if you must know, I got my mom to help me with the actual quilting part (thanks Mom), but the rest of it I did myself. Honest.

When I bought all the material to make H's bedding and pillows for her room I never intended to make a quilt. But then the fabric store got the better of me and I came home with way more material than I would ever need (big surprise). So a quilt was born. Not actually born (thank goodness, I still haven't recovered from H's traumatic delivery) but stitched together with love. Um, no, that's blood. Sometimes the needle and I don't see eye to eye. I didn't mean that as a pun. We really don't get along.


Now H will have something to remind her of me in the terrible event that I die before she is grown-that's irrational fear #34. I won't tell you how long the list is.
Fast forward twenty + years and look at me now! I sew. Or I try to sew. In fact, almost every time I start a project I end up calling my mom to ask three hundred questions. "How do you thread this thing?" "Why is my bottom thread going all wonky?" "Was I a mistake?" (Oh wait, that's for another post.) My mother is too nice to do it to my face, but I'm sure she's the one laughing now. Boring people indeed.
It only took me six months (or is it eight? who's counting?), but I finally finished my very first quilt. Alright, if you must know, I got my mom to help me with the actual quilting part (thanks Mom), but the rest of it I did myself. Honest.

When I bought all the material to make H's bedding and pillows for her room I never intended to make a quilt. But then the fabric store got the better of me and I came home with way more material than I would ever need (big surprise). So a quilt was born. Not actually born (thank goodness, I still haven't recovered from H's traumatic delivery) but stitched together with love. Um, no, that's blood. Sometimes the needle and I don't see eye to eye. I didn't mean that as a pun. We really don't get along.

A closeup of the birdies in the top left hand corner.

I love rick rack. Especially when it is really BIG rick rack.
Everything good in life should be extra large.

The back side is almost as cute as the front.

I love how the new quilt coordinates with the birdies who live above the crib...

and the bedding that I made.

August 31, 2011
Kitchen: The Plan
The other day my eighteen year old niece asked me what I did all day now that I am at home with the baby. I thought about it briefly and then blurted out: I have absolutely no idea.
I thought about it, though, and the truth is: I spend my days trying to keep one very adorable six month old alive...and diapered, and fed, and bathed, and smiling, and clothed, and safe, and entertained, and healthy, and laughing, and on it goes until the crickets start to sing and I fall blissfully into my bed next to a purring orange kitty and a very handsome Diet Coke addict.

This may be the most important thing I ever do and I am desperately trying to enjoy every moment I have with her, memorize every sound she makes, remember every new idea she discovers that makes those blue eyes of hers light up like the stars. She will only be little for so long (not long enough) and I want to be present in every single second of being her mother.
Of course, this means that my house is a wreck, the laundry is chronically dirty, and projects that were started over a year ago still sit where we left them. That is to say, un-done. Incredibly un-done. Remarkably un-done. The un-donest you've ever seen. Un-done-a-doodle.
Which leads me to the kitchen reno. Maybe I should start at the very beginning (a very good place to start...sing with me now!). The plan. Maybe then Mr. and I can get inspired again to get our rear(s) in gear and finish this mammoth of an undertaking.
It's possible to do this and be a parent, right? Other people have successfully raised families while renovating a home. Or so I've been told. Although, people lie. I lie all the time. No I don't. See, I just did.
Sigh. Aren't kitchen renovations the worst? This whole business is making me a little crazy. Or is it? I don't remember.
Without further ado, this is the plan. The method-to-the-incredible-madness plan. There is a lot to be done, so I've written it all down for you. And for me. Sometimes I get a little lost in the details, so it's good to have a plan.
In no particular order:
1. Install bead board ceiling.
2. Install new lighting.
3. Move the refrigerator to the other side of the kitchen to improve the layout and flow of the room.
4. Of course all the cabinetry will be removed and replaced, but this odd little jaunt will not be coming back. Again, to improve the layout and flow of the room.
5. Install built-in banquette seating.
6. Install new molding around windows and doors.
6a. New window treatments. (why wouldn't I just call this 7? wouldn't that be easier? Is there any limit to my weirdness? and why is weird spelled that way? isn't the rule i before e except after c? I think I need a nap)
I thought about it, though, and the truth is: I spend my days trying to keep one very adorable six month old alive...and diapered, and fed, and bathed, and smiling, and clothed, and safe, and entertained, and healthy, and laughing, and on it goes until the crickets start to sing and I fall blissfully into my bed next to a purring orange kitty and a very handsome Diet Coke addict.

This may be the most important thing I ever do and I am desperately trying to enjoy every moment I have with her, memorize every sound she makes, remember every new idea she discovers that makes those blue eyes of hers light up like the stars. She will only be little for so long (not long enough) and I want to be present in every single second of being her mother.
Of course, this means that my house is a wreck, the laundry is chronically dirty, and projects that were started over a year ago still sit where we left them. That is to say, un-done. Incredibly un-done. Remarkably un-done. The un-donest you've ever seen. Un-done-a-doodle.
Which leads me to the kitchen reno. Maybe I should start at the very beginning (a very good place to start...sing with me now!). The plan. Maybe then Mr. and I can get inspired again to get our rear(s) in gear and finish this mammoth of an undertaking.
It's possible to do this and be a parent, right? Other people have successfully raised families while renovating a home. Or so I've been told. Although, people lie. I lie all the time. No I don't. See, I just did.
Sigh. Aren't kitchen renovations the worst? This whole business is making me a little crazy. Or is it? I don't remember.
Without further ado, this is the plan. The method-to-the-incredible-madness plan. There is a lot to be done, so I've written it all down for you. And for me. Sometimes I get a little lost in the details, so it's good to have a plan.
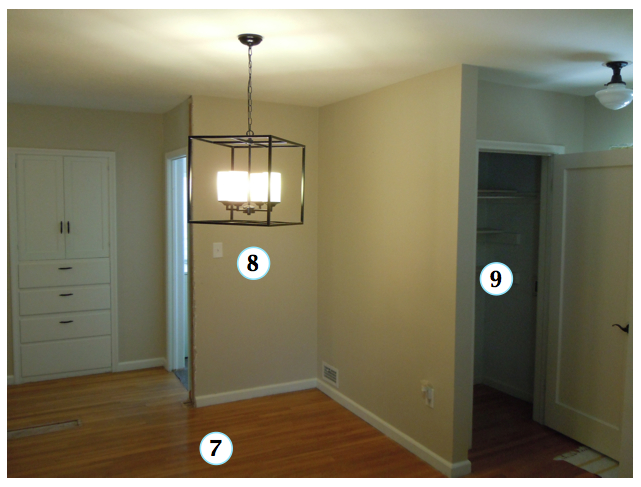
 |
| Looking toward the "banquette" area |
In no particular order:
1. Install bead board ceiling.
2. Install new lighting.
3. Move the refrigerator to the other side of the kitchen to improve the layout and flow of the room.
4. Of course all the cabinetry will be removed and replaced, but this odd little jaunt will not be coming back. Again, to improve the layout and flow of the room.
5. Install built-in banquette seating.
6. Install new molding around windows and doors.
6a. New window treatments. (why wouldn't I just call this 7? wouldn't that be easier? Is there any limit to my weirdness? and why is weird spelled that way? isn't the rule i before e except after c? I think I need a nap)
7. New wood flooring. (oh sure, name this one 7. that makes sense)
8. Remove the walls between the kitchen and dining room.

There, now are you sufficiently confused? Me too. I'm pretty sure a nap will take care of that. Stay tuned for more kitchen madness. This is just the beginning.
 |
| Looking from the dining room towards the kitchen. |
 |
| Looking toward the dining area from the "banquette" area |
9. Move the wall behind the cabinets (there is a closet behind there) one foot back to make room for a dishwasher.
10. New wood range hood over the stove.
11. Replace the glass top stove with a duel-fuel pro style stainless one.
11. Replace the glass top stove with a duel-fuel pro style stainless one.
 |
| Looking towards the back door. |
12. Remove part of this wall and add a railing.
13. Repair the drywall from where we removed a closet to expand the bathroom.

14. Rework the old linen closet into a pantry complete with a barn door.
 |
| Looking from the hallway into the kitchen and dining rooms. |
15. Install fully integrated dishwasher.
Subscribe to:
Posts (Atom)