Pages

Showing posts with label DIY. Show all posts

March 21, 2012

Dining Room Update

It has been a while since I last showed you the dining room. Since then we have ripped out more walls, laid new hardwood floors, installed new baseboards, added crown molding, and repainted. All of these things were still easier than figuring out a way to add the new lamp shade (from Target) to the chandelier that never seemed quite right. THAT was a doozey of a project. 

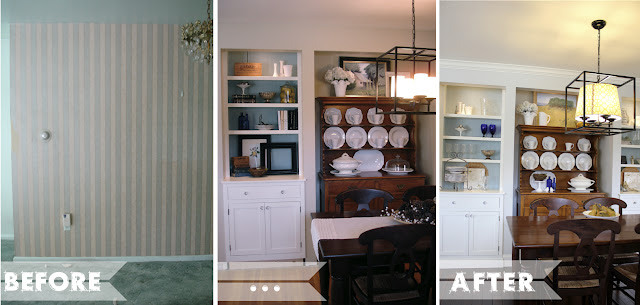
Here is the room now...


Read this to see the back-story about how the built-ins came to be. It's been a long project and we are glad to finally see them 100% finished.

 I lightened up the feel of the built-ins (that I designed and Nate built) by removing all the heavy books and wooden boxes and replacing them with the glass stemware I had previously stored in the base cabinets of the built-ins.


These built-ins also hold a little secret about how they were built - I know I teased you with this before but then I didn't show you {what a jerk!} Nate built the face frames and the inset doors, but the 'guts' of the cabinet came from Ikea. 


We really wanted this new found storage space to be completely usable and we needed smart storage. Our kitchen is small, so I needed to store all of my serving pieces in the dining room including large trays and platters that are bulky and awkward and never seem to fit anywhere. We dreamed up this configuration standing in an aisle at Ikea. We started with a 30" wide base kitchen cabinet - you can buy them without doors, so it's just the box - then we added 24" wide pullouts (one deep and one shallow) and added a vertical divider so that I would have enough space leftover to store trays and platters.


Just like the pullouts we used on the pantry, these pull all the way out to allow for full access to all our serving pieces.

Because we were basically re-framing this wall,  we also added a plug at the back to make a 'smart drawer.'


We added a surge protector with velcro at the back of the drawer. Now the counters aren't cluttered with cell-phones or cameras charging. They are all safely tucked away in the top drawer. A non-skid pad keeps them in place while the drawer opens and closes.


Crown molding finishes off the room and continues on into the living room and hallway providing continuity and cohesion in our small cottage.


I found these square bird plates on sale at Pier One a while ago.

Milk glass handed down from my grandmother (plus one 'fakie' milk glass piece that my mom picked up for me) sits next to my wee Tour de Eiffel that I bought off some street rat vendor in Paris for a couple of Euro. It's one of only a few trinkets that made it safely home from our last jaunt in Europe. Sadly our hand-painted eggs from Salzburg didn't fair so well.

When I was little, my dad used to take me 'bottle hunting.' We would drive out to some deserted and forgotten piece of land and dig up old bottles. These two blue bottles (1940's era?) were un-earthed at a sand dune somewhere between here and Timbuktu (or so it seemed to a then six year old). Maybe that is why for a brief period in my youth I thought I would become an Anthropologist and dig up lost treasures (that or I just had a thing for Indiana Jones, who didn't?)


This is the view looking into the kitchen. The dining room before was dark, with no windows or natural light. Removing the wall between the kitchen and the dining room opened up the whole space and allowed all the light from the windows in the kitchen to stream into the previously dark dining room.
This space still seems a bit dark. Yeah, I know that I just installed dark wood floors, and now I'm complaining about it being dark in here. Go figure. I love the dark floors, just not with a dark table and dark chairs. {so hard to please!} I'm thinking about stripping down the dark stained table and re-staining it with a light gray stain and possibly painting the dining chairs (white? yellow?) There is no end to my fickleness.

This shows the evolution of the built-in wall.


This is the view towards the kitchen.

And because I know you'll ask...here is where it all came from:

Chandelier (the lamp shade was separate)- Overstock.com
Lampshade - Target
Table & chairs - Pottery Barn
Flooring - pre-finished acacia hardwoods from Lumber Liquidators. The color is called Imperial Teak.
Wall paint - Moonshine by Benjamin Moore
Paint on the trim and built-ins - Roman Column by Sherwin Williams
Paint on the beadboard at the the back of the built-ins - Wedgewood Gray by Benjamin Moore
Antique Hutch - inherited from my Grandmother
Artwork - by my mother
Dishes on the hutch - Grand Hotel by Pfalzgraff but is discontinued now.
Antique soup tureen - local thrift store. It was the find of my life!

February 9, 2012

The {Barn Door} Pantry

I would love a walk-in pantry. 

I would also love a master suite, a Porsche roadster, and a baby who doesn't bite me after a marathon nursing session. But, the reality is I have to walk across the hall to use the bathroom, I drive a ten-year old SUV, and my baby bit me today after a marathon nursing session (when will this terrible teething stop?). Oh, and I have a closet for a pantry. 

Here's the probleme-o: I really love to cook, I have an insane amount of kitchen gadgetry that I am not willing to part with, and our kitchen is small. I have to make the most out of every square inch of this small cottage. I needed a pantry. So when we started the kitchen renovation, we also turned our attention to this built-in in the hallway right outside the kitchen. 


This was the view of the built-in and the hallway when we first bought the cottage. That little door was a laundry chute that we removed a while ago. Don't you just love seeing all these old teal photos? This is a bonus photo: you also get to see the pink of the old kitchen on the right side of the photo!


This shows the built-in right before we tore the kitchen out (about three years after we bought the cottage). Normally I don't advocate tearing out built-ins as they add a ton of character and badly needed storage. But in this instance I needed to better utilize the space. This built-in was positioned right over the stairway and the wall is angled down - this will make more sense when you see the inside - so that bottom drawer wasn't as functional as it could have been. Plus there was unused space above the closet that was being wasted.

Tired of all the blah, blah, blah?  Me too. 

Here's the pantry now...


When a friend of mine told her husband that we were planning a barn door for our pantry, he responded with "What? Why?" I get it. It seems an odd choice. Here's why we did it. The pantry is located in the hallway between the kitchen, dining room and bedrooms so the hallway gets a ton of use and we didn't want a big swinging door blocking the traffic. Also, the barn door is awesome. Reason enough!

Now for the inside...


Like I said, the kitchen is small, so we opted to move the microwave out of the kitchen and into the pantry. Because we were re-wiring the entire kitchen and re-framing the "closet/pantry" it was easy to install an outlet at the right height to provide power. 


You can see at the bottom of the pantry how the wall is angled down. Instead of letting that space go to waste, we installed some shallow drawers at the bottom that would utilize the space. 


This pull-out is for all the larger 'small' appliances that I don't use everyday, but often enough that I don't want to store them in the basement storage. Bread machine, crock pot, rice maker, food processor, mini food processor. 


I couldn't have a walk-in pantry, so I devised a pull-out pantry. They pull all the way out, so I have full access to everything I have stored in the drawers. Now every square inch is used for storage. 


Just like in our master closet we used stock components from Ikea to make our pull-outs. For the top three we used the 36"x 24" 'deep' drawer component found in the kitchen section. They don't offer drawer fronts for drawers that wide so we made our own fronts out of MDF (medium density fiberboard). For the bottom two pull-outs we had limited space but the shallow drawers didn't come in 36" widths. We used two 18" x 12" drawers instead, and installed a divider between the drawers out of MDF. For the drawer fronts we used the Ikea ones and then placed some large white plastic bins (also from Ikea) in the pull-outs.

Now for the barn door hardware...


Long before we started this project, we started searching for the perfect hardware. We were not prepared for what we found. Barn door hardware is spendy! Like $400 and up! Yeah, not a splurge we were willing to make.

We happened to mention our predicament to a craftsman who was visiting us one weekend, and he said "Oh, I can make that." We gave him the dimensions and he designed and fabricated the whole thing for our Christmas gift! It really is a work of art. He is a true craftsman...he can make anything. I am proud to tell you that he is also my brother!


He devised these rubber stoppers for each end to keep the door from falling off the track at one end and from running into the wall at the other. Genius!


Thanks for stopping by. Cheerio! (Sorry, I'm allowed one bad pun a week and I had to reach my quota!)

In case you missed it, go here to see how we made the barn door. 

How To: Make a Barn Door

During the renovation of our little cottage, we have moved walls, altered the floor plan, and removed doors (among other things), which means we have lots of cast-offs/junk/debris filling the garage. So when it came time to build the new barn door to cover the pantry, we decided to use what we already had on hand (you know we love to do that). 

So we took two of these guys (no idea why there is only one door in this pic. maybe the other one is hiding): 


We ... ok let's be accurate here...the Mr. cut them into pieces and then using a pocket-hole jig he screwed the pieces together and then filled the holes with pocket-hole plugs. **Nate wants you to know that this is not the proper way to build a door. This is the way you build a door when you are trying to use up old doors and you are short on time (or patience...not what he said, that was me) and you just want to build a {insert profanity here} barn door already. If you are curious as to how to properly build a door, well...we'll discuss that later when we show you how he built the cabinets in the dining room. Until then...behold our blunders in door building.**


Here are the plugs in action. I know, it's a beautiful sight.


Then he sanded those bad boys down using an orbital sander. Ooooh! Nice moves.


Then he used a router on the back to make room to insert the v-groove panel. I applauded and then ran inside where it wasn't freezing.


That's the back, that's why all those holes are still exposed. No one will see them when it's installed so no one will remember that they are there. Except you. Forget you saw this picture.


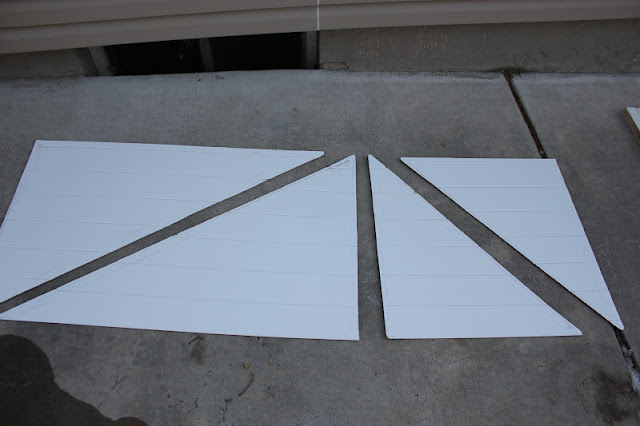
Here is the v-groove panel after it was cut and ready to install in the back of the door. Are you kind of worrying about the water that is inching too close to the paneling? Are you picturing Mr. with his angry face because the paneling is now wet? No? Just me? **Hurry move the paneling!**


H helping her Dad screw holes in the top for the barn door hardware. Such a good helper.


Prime & paint the barn door in Roman Column - the color of all the trim in the house.


Almost there! Now we need a handle...


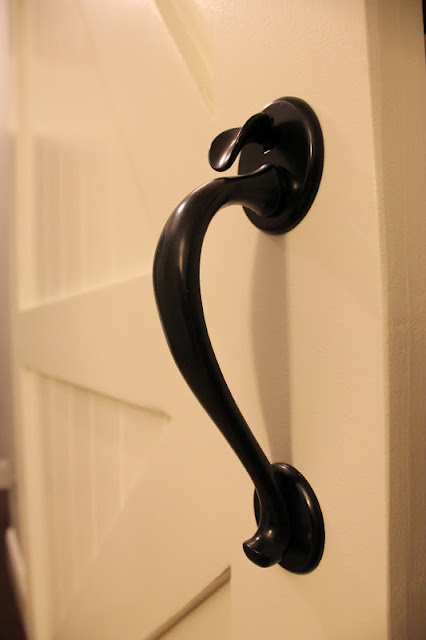
This came off our old front door. It's seen better days. We thought it might clean up nicely.


Alright, maybe a little too nicely. Brass isn't for me. 


With a coat of black satin spray paint. That'll do.

Come back tomorrow for all the glorious after shots. The long-awaiting, we-thought-this-would-never-get-done, holy-moses-it's-a-beauty barn door is up, and we  l - o - v - e it!


...

Related Posts with Thumbnails